What's better on a cold, blustery day than a nice bowl of chicken noodle soup?? Well, how about a nice bowl of HOMEMADE chicken noodle soup?? I love soup and have made so many homemade ones that I can no longer eat canned soups. And cheap?? Wow!! It is amazing how cheap a homemade pot of soup is!! This recipe will easily feed us a few meals at least!!
This recipe was a new one for me...I got it while looking for diet recipes. This recipe, as is, is a 1 point recipe (whatever that means). I followed the original recipe pretty close...made some changes. I found it to be fairly bland...so I added some salt and pepper at the end. I will make my changes in red!
Weight Watchers Chicken Noodle Soup Recipe
Ingredients:
1 chicken whole, no skin, cut up (I kept skin on for added flavor...until I deboned the chicken)
2 medium Carrots — peeled and chopped (GROSS...left this out completely)
1/2 cup onion — peeled and chopped
2 Stalks celery — coarsely chopped
2 1/2 teaspoon Salt (more at the end for flavor)
2 teaspoon parsley (yuck)
3/4 teaspoon marjoram
1/2 teaspoon basil
1/4 teaspoon Poultry seasoning
1/4 teaspoon Pepper (more at the end for flavor)
1 Bay leaf
2 qt Water
2 1/2 cups egg noodles (I have egg noodles, so I used rotini...I want to learn to make my own pasta)
Directions:
Place the first 4 ingredients in a 3 1/2-quart slow cooker in the order listed. Combine salt and the next 6 ingredients; sprinkle over vegetables. Add 6 cups water; cover and cook on low setting for 8 to 10 hours. Remove chicken and bay leaf; add remaining 2 cups water. Stir in noodles and cook, covered, on high setting for 20 minutes. Meanwhile remove bones from chicken and cut chicken into bite-size pieces. Add to slow cooker, stir to mix. Cook for 15 minutes on high setting, covered or until noodles are tender. Makes 3 1/4 quarts.
Entire Recipe makes 13 servings
Each serving = 1 cup
Each Serving = 1 Weight Watchers Point
Last night, I made this dish and it was love at first sight. Yummy!! I think you should really try it and I think you might really love it. Now, the original recipe is meant to be diet (weight watchers points of 7), so I will post the original and post what I changed cause...as you no doubt know about me, I am not good with dieting. I served this on orzo last night and bow tie pasta as leftovers tonight. Worked great with both, though I liked it better on orzo. I think it would go with whatever you like. Crock Pot Chicken ParisienneIngredients - 6 skinless, boneless chicken breasts (approx 4 oz each) frozen
- 1/2 cup dry white wine
- 1 (10.75 ounce) can Campbell’s 98% Fat Free Cream of Mushroom Soup full fat
- 1 package fresh mushrooms, sliced (about 10 oz)
- 1 cup fat free sour cream full fat
- 1/4 cup all-purpose flour because I was using frozen chicken breasts and would generate lots of liquid, I was generous with the flour to help make the sauce thick...and it worked
- salt and pepper to taste garlic salt
- paprika to taste
Instructions - Sprinkle chicken breasts lightly with salt, pepper, and paprika to taste. Place in slow cooker.
- In a mixing bowl, combine the wine, condensed soup, and mushrooms.
- In another bowl, mix together sour cream and flour. Stir sour cream mixture into the mushrooms and wine.
- Pour over chicken in slow cooker. Sprinkle with additional paprika, if desired.
- Cover, and cook on Low for 6 to 8 hours.
Preparation time: 5 minute(s) Cooking time: 6 hour(s)
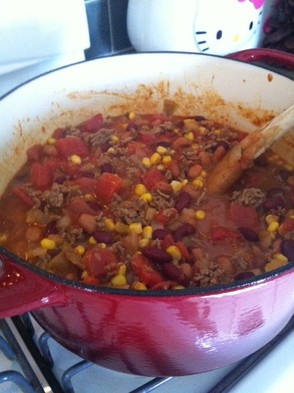
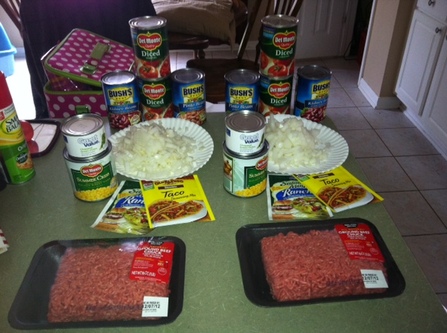
Taco Soup! Have you ever eaten it?? If you have, than don't you LOVE it!! If you haven't...than GET TO IT!! Taco Soup is quite possibly my favorite soup EVER!! I LOVE it SO much. It is full of flavor with just the right mix that makes it perfect for cold nights!! It is an easy favorite for the family and the ultimate comfort food. If you know what is good for you, you will go buy these ingredients and make this soup the next time you are faced with a cold night!!
Taco Soup
Ingredients
1 lb ground meat or turkey (I do meat)
1 large onion, chopped
1 pkg dry taco seasoning
1 pkg dry ranch dressing mix
2 cans beans (I use 1 can dark red kidney beans and 1 can pinto) drained and rinsed thoroughly
1 (14 oz) can corn, drained
2 (14 oz) cans of diced or stewed tomatoes
1 (4 oz) can chopped green chiles, drained
salt and pepper to taste (I do not tend to add this as there is already so much flavor)
Directions
Brown meat and onion and drain off excess fat. Add taco seasoning, ranch dressing mix, beans, corn, tomatoes chiles, and salt and pepper (if using) and stir. Simmer for 20-30 minutes. Yields about 10 cups of soup. Freeze leftovers (we tend to eat leftovers the next day) in baggies.
When serving, I like to put fresh grated sharp cheddar and some crumbled up tortilla chips on top!! Make this soup!! It is incredible!!
It has been a VERY long time since I posted a recipe...I'm very sorry. Life has been extremely busy and I just haven't had the time to blog much of anything lately. BUT, my kids are now off on Christmas break...3 weeks....yes, I am happy. I am going to try and get caught up on some posts.
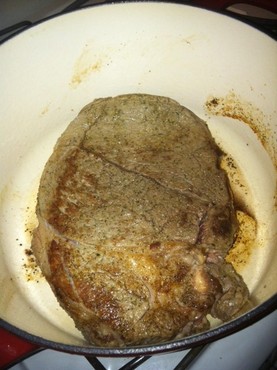
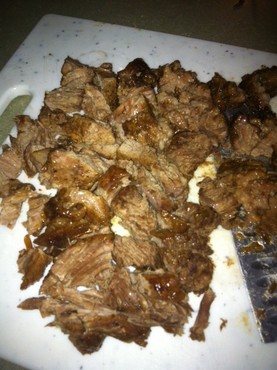
So...I recently received an incredible early present from my in-laws. Oh, how I love this. It is SO awesome to have, I just can't say it enough. They got me an enamel covered cast iron dutch oven!!!!!!! Oh my, I have always wanted one, but too many other things in life take priority. Imagine my surprise when my mother-in-law texted me to tell me she ordered our gift at Wal-Mart's website for site to store shipping because it was too heavy for her to have shipped. When I went to pick it up, I saw why....that sucker is heavy. I was EXTREMELY excited and began to plan what I would make with this wonderful new addition to my kitchen. One of the first things that came to mind was a roast. I saw on several websites people mentioning that you cook the roast in it and than can make the gravy in the same pot....I was SOLD!!
So.....I did....the results were ASTOUNDING. We have had GREAT roasts before...but everyone agreed that this was, by far, the best roast EVER!!
So, here is what I did. I got a chuck roast. I seasoned it all over with salt and pepper (with some garlic salt thrown in). I heated oil in my dutch oven on the stove top for about 5 minutes so the pan could get nice and hot. I put the seasoned roast into the hot pan and began searing all the sides. The smells were instant HEAVEN.
Meanwhile, I am not much on potatoes or carrots with my roast, so I took whole mushrooms and washed them. When the roast was done searing, I took it out and put the mushrooms on the bottom of the pan. I put the roast back in on top of the mushrooms.
In a bowl, I whisked together 1 package of Italian dressing (dry mix) and 2 packages of lipton beefy onion soup mix with some water. I did not measure, I was going for a consistency that was not quite a paste, but not very watery. This is the one thing I would change for next time....I would add a bit more water to it (or season the meat less for searing...it was a bit salty). I covered the roast in the mixture and transferred my dutch oven into the oven.
So, I cooked the roast at 325 degrees for about an hour and a half. When it was done, I brought it back onto the stove top. I removed the meat and mushrooms and let the meat settle and began working on the gravy which had become somewhat watery from the mushrooms. I let it simmer on the stove....taking a small amount of the gravy out and putting in a bowl and adding flour to the bowl to mix together (this helps avoid lumps) and than adding back to the pan. I kept adding until I reached the consistency I liked.
Then it was time to serve. The meat was so tender and full of flavor, the mushrooms were incredible, and the gravy went well with the mashed potatoes and rolls we had for the side. This recipe is A+++!
I haven't been on in awhile. I have been rather busy and haven't had the time or energy to do much typing or computing...but I have not stopped cooking. I wanted to share this recipe that I have made off and on for a while now and it is one I got from the Pioneer Woman website. Her recipes are hit and miss with me, but this one was a big hit. To like this recipe, you must like MEAT, pasta, and cheese. If your palate fits into these categories, you should like this recipe. Well, you should LOVE it. I do not do much to change the recipe except for maybe the amount of cottage cheese, sour cream and shredded cheese used....that is, I add more of each of these. I also season the meat as it is cooking and maybe a bit more when I make the sauce. Is this healthy?? NO!!! Does it taste GREAT!?? YOU BETCHA!!! Do I have pictures?? Do you KNOW me?? Sour Cream Noodle BakePrep Time 10 Minutes Cook Time 20 Minutes Servings 8 Ingredients - 1-¼ pound Ground Chuck
- 1 can 15-ounces Tomato Sauce
- ½ teaspoons Salt
- Freshly Ground Black Pepper
- 8 ounces, weight Egg Noodles
- ½ cups Sour Cream
- 1-¼ cup Small Curd Cottage Cheese
- ½ cups Sliced Green Onions (less To Taste)
- 1 cup Grated Sharp Cheddar Cheese
Instructions Preheat oven to 350 degrees. Brown ground chuck in a large skillet. Drain fat, then add tomato sauce. 1/2 teaspoon salt and plenty of freshly ground black pepper. Stir, then simmer while you prepare the other ingredients. Cook egg noodles until al dente. Drain and set aside. In a medium bowl, combine sour cream and cottage cheese. Add plenty of freshly ground black pepper. Add to noodles and stir. Add green onions and stir. To assemble, add half of the noodles to a baking dish. Top with half the meat mixture, then sprinkle on half the grated cheddar. Repeat with noodles, meat, then a final layer of cheese. Bake for 20 minutes, or until all cheese is melted.
I know absolutely nothing about weight loss. I know absolutely nothing about weight watcher points. I do know about Pinterest. I do know about finding great blogs with great recipes through Pinterest. And, I do know that I like to try things, even if I do not completely get it. I mean, this recipe, as is, is a 6 point value. Is that good?? Is that bad?? What if I served it with yeast rolls, mashed potatoes mixed with sour cream and butter?? What if I couldn't find diet Sprite in one can and since I do not like Sprite, I did not want to buy a 12 pack...so I just went with the full sugar version of Sprite? Are you asking what Sprite has to do with this?? You'll see.
So....here is what I DO know. What I DO know this looked good on the blog I was on. What I DO know is I was anxious to try it. What I DO know is that it tasted AMAZING!! And, what I DO know is that it was so good that it did not yield leftovers. The meat was SO tender, the flavor was so...well....flavorful, the kids LOVED it...and I do not get to eat any of it for lunch tomorrow!!
So, this is a crock-pot recipe! It is INCREDIBLY easy...doesn't get easier! On the blog, they say to use Diet Sprite, but as stated, it was just too difficult to find ONE can, so I went with regular. It also recommended you add in any zero point veggies...whatever those are?? I did not add any veggies, but I would love to add some whole mushrooms to this...maybe some white onion.... As stated, I served with sour cream and butter filled mashed potatoes (that I smothered in gravy) and yeast rolls....that I dipped in gravy. Weight Watchers??? Pft!
This recipe is EASY and a crowd pleaser!!
Beef Tips in Mushroom Sauce
Ingredients:
2 pounds lean chuck – cut in 1 – 3/4 inch pieces
1 can 98% fat free cream of mushroom soup
1 pkg. onion soup mix
1 can Diet Sprite or 7up
*Feel free to bulk this up with any zero point vegetables that you choose!
Directions:
Put meat in crock pot. Pour soup & onion soup mix over meat. Add Diet Sprite/7up. Cook in crock pot all day on low (or high for at least 4 hours). Turn off and let sit for 30 minutes before serving.
Makes 8 servings.
Each serving = 6 Weight Watchers Points
*sigh* Pie crusts. You wonder why so many people buy premade ones?? Maybe because it is such a PAIN to find a good one that will not be tough or hard...will be flaky and light. But....if you get the store bought ones, than you are stuck with a funky flavor. A couple years ago, I was trying to get away from store bought...figuring how hard can it be to make pie crust? Lucky me, a friend instantly gave me her favorite pie crust recipe and I used this one for the past few years: This recipe came from Martha Stewart and involved ingredients like butter and the use of a food processor. What did I have to lose? Pate Brisee Makes two 8- to 10-inch single-crust pies or one 8- to 10-inch double-crust pie Ingredients - 2 1/2 cups all-purpose flour
- 1 teaspoon coarse salt
- 1 teaspoon sugar
- 1 cup (2 sticks) chilled unsalted butter, cut in pieces
- 1/4 to 1/2 cup ice water
Directions - Place the flour, salt, and sugar in the bowl of a food processor, and process for a few seconds to combine. Add the butter, and process until the mixture resembles coarse meal, about 10 seconds. With the machine running, add the ice water in a slow, steady stream, through the feed tube, just until the dough holds together. Do not process for more than 30 seconds.
- Turn the dough out onto a work surface. Divide in two. Place each half on a sheet of plastic wrap. Flatten, and form two discs. Wrap, and refrigerate at least 1 hour before using.
Okay...is this recipe good? Yes it is. I felt, though that it lacked a certain flaky texture. It would come out a bit hard and not quite what I had hoped. This year, I thought I would try something different. I was torn between 2 recipes...one I got from The Pioneer Woman website and one was a Paula Deen recipe. One used butter AND shortening and the other just used shortening (can you guess where the butter one came from?). I decided to go with Paula Deen as I thought I would have the nice butter flavor and the addition of shortening may provide the flaky quality I was looking for. I made this crust and filled it with a different apple pie filling recipe...baked it up and was happy. Then, I got ready for the Cherry Cheesecake Pie and I got to thinking....what if Pioneer Woman is right...what if this OTHER crust is the BEST? I had all the ingredients...so I decided why not try it out on the second pie. And that is just what I did. I will post the two recipes in a sec, but let me give a quick review. The Paula Deen recipe does, indeed, have that flaky quality I was missing in the Martha Stewart recipe. It has the right amount of flake and the right amount of butter flavor. I just got through eating a slice of the apple pie and was over the moon with how the crust came out. On the flip side, the crust on the Cherry Cheesecake Pie was also flaky (maybe not quite as flaky as the other, but it is served cold while the other is served warm). It lacks that butter flavor, but that seems to work well with the almondy/cherry/cheesecake flavors already vying for attention with the taste buds. My conclusion....Let the pie crust fit the pie. I think I will pair the Paula Deen recipe up with those pies that are heated up and enhances the flavors and vice versa on the Pioneer Woman crust...cold and creamy pies. I will not be making the Martha Stewart crust anymore, even if it is easier letting the food processor do the work (in her defense, mine might be harder, less flaky because my food processor is extremely powerful...it might be over-working the crust). So, here are the two recipes!! ENJOY!!! Paula's Perfect Pie Crust: - 2 1/2 cups all-purpose flour
- 1/4 teaspoon fine salt
- 3 tablespoons granulated white sugar
- 1/4 cup vegetable shortening, cold
- 12 tablespoons butter, cold and cubed
- 1/4 cup to 1/2 cup ice water
In a large mixing bowl, sift together the flour, salt and sugar. Add the shortening and break it up with your hands as you start to coat it all up with the flour. Add the cold butter cubes and work it into the flour with your hands or a pastry cutter. Work it quickly, so the butter doesn't get too soft, until the mixture is crumbly, like very coarse cornmeal. Add the ice water, a little at a time, until the mixture comes together forming a dough. Bring the dough together into a ball. When it comes together stop working it otherwise the dough will get over-worked and tough. Divide the dough in half and flatten it slightly to form a disk shape. Wrap each disk in plastic and chill in the refrigerator for about 30 minutes. On a floured surface roll each disk out into a 10 to 11-inch circle to make a 9-inch pie. Yield: 2 (9-inch) pie crusts AND Pioneer Woman's: Sylvia's Perfect Pie CrustIngredients - 1-½ cup Crisco (vegetable Shortening)
- 3 cups All-purpose Flour
- 1 whole Egg
- 5 Tablespoons Cold Water
- 1 Tablespoon White Vinegar
- 1 teaspoon Salt
Preparation Instructions In a large bowl, with a pastry cutter, gradually work the Crisco into the flour for about 3 or 4 minutes until it resembles a coarse meal. In a small bowl, beat an egg with a fork and then pour it into the flour/shortening mixture. Add 5 tablespoons of cold water, 1 tablespoon of white vinegar and 1 teaspoon of salt. Stir together gently until all of the ingredients are incorporated. Separate the dough into thirds. Form 3 evenly sized balls of dough and place each dough into a large Ziploc bag. Using a rolling pin, slightly flatten each ball of dough (about ½ inch thick) to make rolling easier later. Seal the bags and place them in the freezer until you need them. (If you will be using it immediately it’s still a good idea to put in the freezer for about 15 to 20 minutes to chill.) When you are ready to use the dough to make a crust, remove from the freezer and allow to thaw for 15 minutes. On a floured surface roll the dough, starting at the center and working your way out. (Sprinkle some flour over top of the dough if it’s a bit too moist.) If the dough is sticking to the countertop use a metal spatula and carefully scrape it up and flip it over and continue rolling until it’s about ½ inch larger in diameter than your pie pan. With a spatula, lift the dough carefully from the surface of the counter into the pie pan. Gently press the dough against the corner of the pan. Go around the pie pan pinching and tucking the dough to make a clean edge. **NOTE: I did not separate this in thirds, I divided in half.
Ribs. This is a food that has alluded me for many years. I like ribs a lot, but, for some reason, I have never....ever....made them. I was actually nervous/scared to try and cook them. Why? I am not sure. I just steered away from them.
Last week, I came across a recipe for ribs cooked in the crockpot and I sat up and took notice. If you cannot tell, I am crockpot obsessed. This recipe was so simplistic that I thought...why not give it a go. And a go I did.
The recipe calls for you to flip the ribs over half way through the day. Well, Thanksgiving is just a day away...I was not staying at home. I admit to fretting some throughout the day while we were gone...fearful that my ribs were going to dry out without being flipped. As soon as I got home, I ran in the house and flipped them over and hoped that cooking for just 45 minutes more on the flip side would repair any damage done. Uh....yeah.....no damage!! These ribs were amazing. Incredibly amazing. Awesomely amazing.
I must tell you, I was a bit nervous about the recipe. It called for a cup of soy sauce. I am not a fan of this sauce and a cup seemed excessive. I bought the low sodium variety. It also called for a cup of packed brown sugar which also scared me (I am not a fan of sweet main courses). When I came home, the house smelled strongly of soy sauce and I became further fearful. What had I done???
In the end, as stated already, the flavors blended beautifully...everyone loved it....this will make it in the repeat files.
So, it's simple:
Get about 4 pounds of ribs (we got beef). Place them in your crockpot (we had to slice the racks of ribs in half). Place 5 WHOLE jalapenos on top. Mix together in a bowl the 1 cup of soy sauce and 1 cup of brown sugar and than pour it over the ribs. Cover and cook on low for 8 hours, flipping the ribs over halfway through the day.
Make this!! It is GREAT!!!
 Is it just me, or is Thanksgiving awfully early this year. Thanksgiving is a week from today and I have got a lot of planning to do. Recipes must be assembled; shopping lists must be made. Number 1 on the list? Well, it's not turkey this year.
Thanksgiving at our house is traditionally not all that traditional. We do not have any family close by and so we usually spend it with just us four and no more. Feel sorry for us? Well, don't!!! Oh, family is great...but there is something to be said with an intimate holiday spent in pjs and carving out our own traditions.
Traditionally speaking, we have always been somewhat mainstream with the meal portion of the holiday: Turkey, stuffing, a veggie or two of some sort (green bean casserole anyone), rolls, salad, and at least 2 pies (yes, even for our family of 4). Every year, the house gets filled with the cozy aroma of these foods cooking and we decorate the house for Christmas, we put Christmas music on, and we break out the Christmas movies. It is all very picturesque (minus the pjs, the unkept hair, the no makeup...the pure casualness).
Every Thanksgiving night, though, as we sit together to enjoy our feast, I find myself only slightly enjoying the meal. Turkey is an "eh" for me and the sides (which I like more than the turkey) are just ok. I do it every year and every year I just am dissatisfied. Last year was the final straw. At the end of the day, as I was reflecting on how great Thanksgiving is and all I was thankful for, I thought that the only downside to it all was the meal itself. Shouldn't the meal be the icing on the cake?? Why is it that I look forward to just about every meal I prepare but this one.
Than it occurred to me. Why do we have to do turkey? I am not alone in the feeling of dissatisfaction over the turkey and the sides. The desserts are all anyone ever really looks forward to. The quandary came in the form of what do we do instead. Ham? Well, we do ham at Christmas and that is one thing I am just unwilling to change. So...what do we do. We can't just have tacos or other ordinary food. Than I had that "A ha!" moment.
Ok...so....I started thinking. What is the beauty of America?? We are a melting pot of culture. So, why not celebrate those cultures? Oh, not all at once. Here is what we did: We put different cultures into a hat. We pulled the first culture out and that would be the culture celebrated at our next Thanksgiving...and pulled out another and that culture would be the following Thanksgiving...and so on and so forth until we had the next 8 Thanksgivings planned out!! The level of excitement grew and Thanksgiving has been made fresh and anew.
So, what do we have to look forward to this year? Oh I am so excited. This year we are going Greek! This is especially poignant because Matt's birthday falls on Thanksgiving this year and Greek is one of his favorite foods. We will be having lamb gyros, greek salad with lots of feta, hummus with veggies and pita chips, olives, and anything else we can think of. We will not do a Greek dessert...it was special requested that we not mess with the traditional Cherry Cheesecake Pie and Apple Pie I make every year.
This Thanksgiving will be the best one yet. There is no doubt about it.
Stay tuned for recipes...and come back in a year when we celebrate Mexico!!!
It has been a while since I last posted a recipe. It's not that I haven't been cooking. Quite the contrary. I have been cooking a LOT. However, I have also been exceptionally busy. I think it would be great to take all those people who thing that stay at home moms and homeschoolers don't do anything and let them spend a day in our shoes. Good grief!! It is Saturday and I would just like to spend the day at home relaxing!! Seriously!!
OK...that is the end of my whining. Earlier this week, I made this dish and let me tell you...it was delish. I mean, how could it not be...artichokes, tomatoes, chicken. YUM!! It is simple in it's design and structure, but the flavors are anything but simple. It is really a great dish. Best part? It fed my family of 4 for 2 days and yielded a lunch for me!!
Here's what you do (sorry no pics....I have really been busy!).
Italian Chicken
Ingredients:
4-5 Roma Tomatoes
2 cloves artichokes
small jar of artichoke hearts
extra virgin olive oil
salt and pepper (I used a greek seasoning mix)
6 or so boneless, skinless chicken breasts
fresh mozzarella
Fresh basil
Favorite Pasta (I used spaghetti noodles)
Core and chop about 4-5 roma tomatoes.
Thinly slice two cloves of garlic.
Drain a small jar of artichoke hearts.
Place all ingredients in a bowl and pour in a few tablespoons of extra virgin olive oil, a generous amount of S&P, a teaspoon of sugar, a couple tablespoons of flour {since the chicken will produce so much liquid}.
Place the tomato mixture in with the boneless skinless chicken breasts {that are generously seasoned with S&P}. Place in a 350 degree oven and bake until the chicken is almost done.
Take the almost done chicken out of the oven and sprinkle mozzarella cheese over the top. Place the chicken under the broiler for a few minutes {keep an eye on it!} until the cheese is golden brown and the vegetables are caramelized.
When you pull the chicken out of the oven, sprinkle some fresh basil on top and the heat of the dish will wilt the basil.
Serve over whatever pasta you love and ENJOY.
|

 RSS Feed